iPhoneApplication FMDBの使い方
皆さんこんにちわ
お元気ですか?私は元気です。
最近失速気味で申し訳ない。記事に書きたいこと、勉強していることは増えているのですが、どうしても時間が取れず;;
さて、本日はFMDBの使い方について
sqliteと呼ばれるDBのアプリケーションが存在するのですが、それをiPhoneの開発時に簡単に使えるライブラリです。
ちなみに私のXcodeのVersionは5(5.2)です。
外部からライブラリを入れるので色々使う時にはライセンスなどの注意が必要です。
FMDB
導入方法
Download
ライブラリを導入
ダウンロードしたFMDBを解凍後、ライブラリを導入する
解凍したフォルダの中にあるsrcを開く、
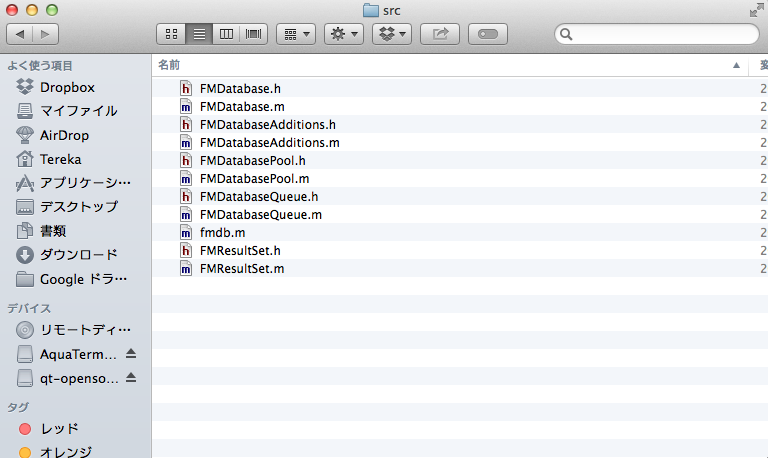
プロジェクトはこのような感じです。
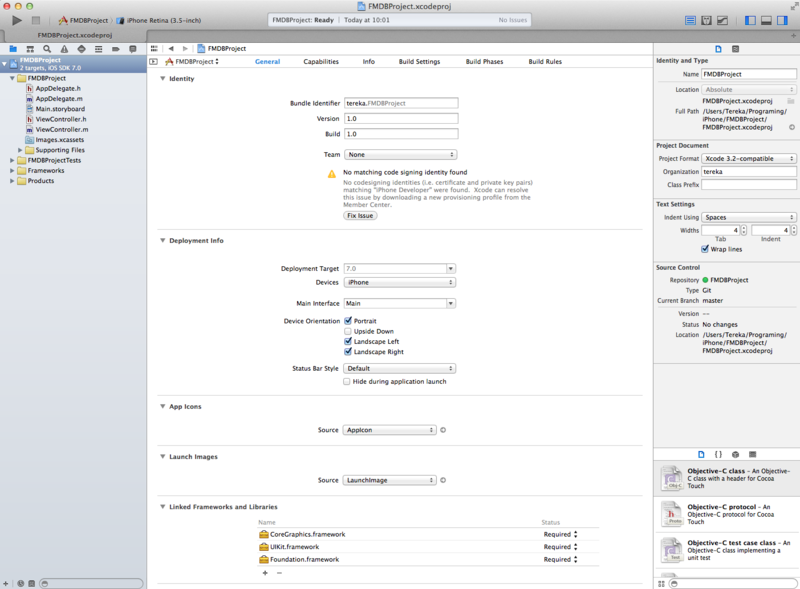
この中からfmdb.m以外をプロジェクトへドラッグアンドドロップ
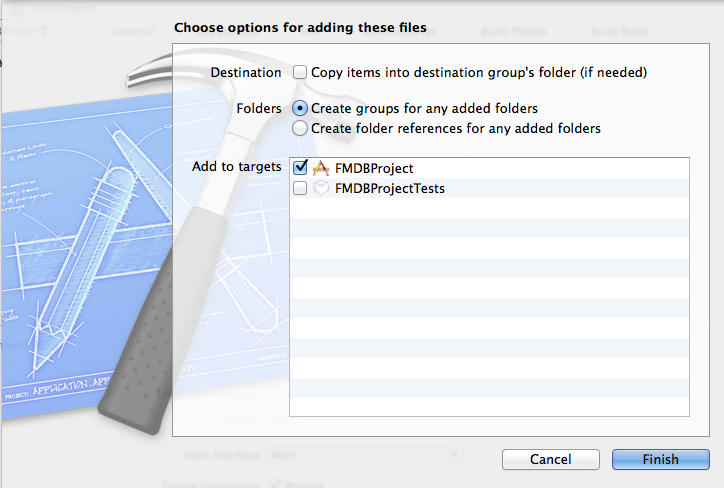
Finishを押す。
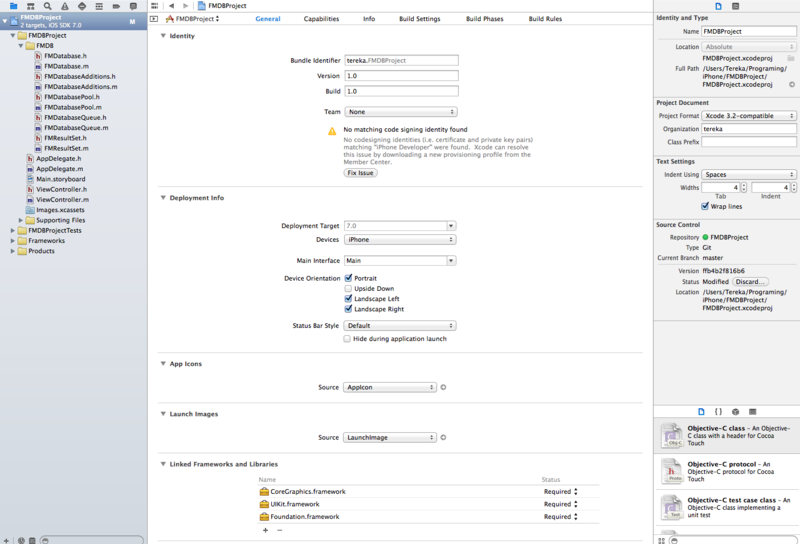
この部分のLinked Frameworks and Librariesの+を押し、libsqlite3.0.dylibを選択しaddを押す。
使用法
データベースの作成・読み込み
- (BOOL)application:(UIApplication *)application didFinishLaunchingWithOptions:(NSDictionary *)launchOptions
{
    //Documentフォルダの検索
    NSArray *paths = NSSearchPathForDirectoriesInDomains( NSDocumentDirectory, NSUserDomainMask, YES );
    NSString *dir   = [paths objectAtIndex:0];
    //file.dbのDBファイルを作る。存在していれば読みこむ
    FMDatabase *db= [FMDatabase databaseWithPath:[dir stringByAppendingPathComponent:@"file.db"]];
    NSString *sql = @"CREATE TABLE IF NOT EXISTS test (id INTEGER PRIMARY KEY AUTOINCREMENT,testname TEXT);";
    [db open];
    [db executeUpdate:sql]; //SQL実行
    [db close];

    return YES;
}
一応、アプリ立ち上がった時に実行するように組んでます。
うん、フォルダを検索して、なければ作る。ただそれだけ。
補足:ヘッダーに
#import "FMDatabase.h"
#import "FMResultSet.h"
を付けてください。
SQLを実行する
INSERT UPDATEを実行
//INSERT文を作る
NSString *insertSQL = @"INSERT INTO test(testname) VALUES (?)";
[db open];
//?に値を入れる配列を作る
NSArray *insertArgument = [[NSArray alloc] initWithObjects:@"test", nil];
//SQLを生成
[db executeUpdate:insertSQL withArgumentsInArray:insertArgument];
[db close];
通常のSQLを生成して、動的に変化させる部分を配列で作っています。
SQLをexecuteUpdateで実行しています。
SELECTを実行
NSString *selectSQL = @"select * from test";
[db open];
//結果を取得
FMResultSet *results = [db executeQuery:selectSQL];
//結果を取り出し
while( [results next] ){
   //テストネームのカラムを取得する
   NSString *testname = [results stringForColumn:@"testname"];
   NSLog(@"%@",testname);
}
[db close];
同じようにSQLを生成していますが、実行するメソッドをexecuteQueryを使用しています。
取得した結果をFMResultSetに格納し、whileにより、一つ一つ処理しています。
iPhone Application 一番下までスクロールしたらTableVIewが増加するプログラム
皆さんこんにちわ
お元気ですか?私は眠いです。
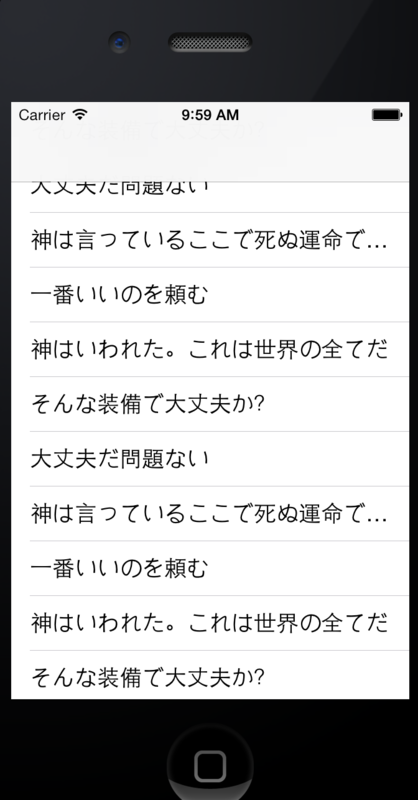
さて、本日はスクロールについてやってみます。
プロジェクトの生成〜Navigation Controllerの配置
まずは、プロジェクトを作ります。
次に最初にあるViewを削除し、TableViewを配置する。
TableViewを選択し、Editor→Embed in →Navigation Controllerを選択。
Prototype Cells
Table View cell の identifierをCellに変更
TableView
新しくファイルを作りクラスはUITableViewを選択
Custom ClassでClassで先ほど作ったファイルのクラス名を選択
そこまで終わると以下のようなイメージになります
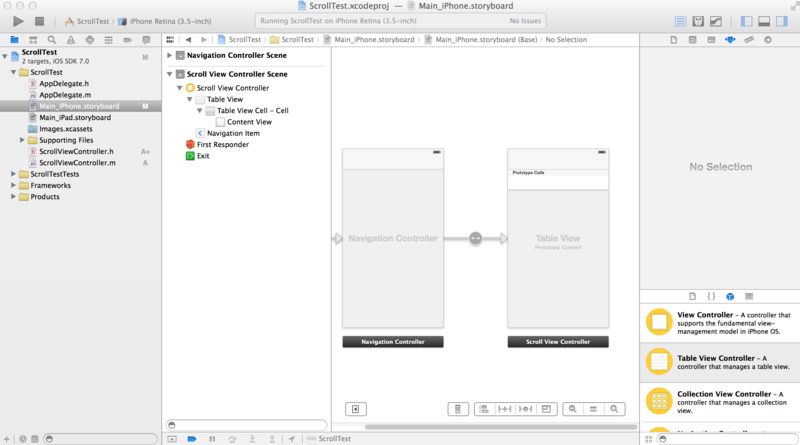
さて、コードでも書くか。
ソースコード
ScrollViewController.h
#import <UIKit/UIKit.h>

@interface ScrollViewController : UITableViewController{
    NSArray *TableContents;
    int page;
}

@end
ScrollVIewController.m
#import "ScrollViewController.h"

@interface ScrollViewController ()

@end

@implementation ScrollViewController

- (id)initWithStyle:(UITableViewStyle)style
{
    self = [super initWithStyle:style];
    if (self) {
        // Custom initialization
    }
    return self;
}

- (void)viewDidLoad
{
    [super viewDidLoad];

    page = 3;
    TableContents = [self createData];
}

- (NSArray *)createData{
    NSMutableArray *data = [NSMutableArray array];

    for(int i = 0; i < page; i++){
        [data addObject:@"神はいわれた。これは世界の全てだ"];
        [data addObject:@"そんな装備で大丈夫か?"];
        [data addObject:@"大丈夫だ問題ない"];
        [data addObject:@"神は言っているここで死ぬ運命ではないと"];
        [data addObject:@"一番いいのを頼む"];
    }

    return [data copy];
}

- (void)scrollViewDidScroll:(UIScrollView *)scrollView
{
    if(self.tableView.contentOffset.y >= (self.tableView.contentSize.height - self.tableView.bounds.size.height))
    {
        page++;
        TableContents = [self createData];
        [self.tableView reloadData];
    }
}

- (void)didReceiveMemoryWarning
{
    [super didReceiveMemoryWarning];
}

#pragma mark - Table view data source

- (NSInteger)numberOfSectionsInTableView:(UITableView *)tableView
{
    return 1;
}

- (NSInteger)tableView:(UITableView *)tableView numberOfRowsInSection:(NSInteger)section
{
    return TableContents.count;
}

- (UITableViewCell *)tableView:(UITableView *)tableView cellForRowAtIndexPath:(NSIndexPath *)indexPath
{
    static NSString *CellIdentifier = @"Cell";
    UITableViewCell *cell = [tableView dequeueReusableCellWithIdentifier:CellIdentifier forIndexPath:indexPath];

    if (!cell) {
        cell = [[UITableViewCell alloc] initWithStyle:UITableViewCellStyleSubtitle reuseIdentifier:CellIdentifier];
    }
    cell.textLabel.text = [TableContents objectAtIndex:indexPath.row];
    return cell;
}

@end
解説
ScrollVIewController.h
TableContents:内容
page:ページ数を設定しています。
ScrollVIewController.m
ViewDidRead
初期化に必要な設定、ページ数と内容の設定を行っています。
createData
データ作っています。
scrollVIewDidScroll
ScrollViewDidScrollメソッドをオーバーライドするのかなぁ…?
なんかこれを実装するとスクロールしたときに呼ばれます。
tableView.ContentOffset.y = 今の表の全体のサイズ(y軸)
tableView.ContentOffset.height =スクロール
tableView.bounds.height = 表示されてるサイズ
だと思う。
まぁ高さ足りなくなったら増強すりゃいいじゃんって発想です。
iPhone Push down refresh、Refresh Controller くるくるまわってロード
皆さんこんにちわ
お元気ですか?私はスリープが嫌いになりました。睡眠じゃないです。PCです。
ええ、nohupが仕事をしなかったのですよ。大量の時間を無駄にしました。
今も動いてたらうれしいなぁ…多分日曜日に終わるか終わらないかだから、勝手に仕事してくれないと困るんです。
さて、本日はリフレッシュ機能について
あの、twitterとかで上にくいってするとくるくるまわって更新するあやつのことです。
Push down refresh とか Refresh Controllerっていうんですね。
今日はそれを実装してみましょう。
StoryBoard
プロジェクトの生成〜Navigation Controllerの配置
まずは、プロジェクトを作ります。
次に最初にあるViewを削除し、TableViewを配置する。
TableViewを選択し、Editor→Embed in →Navigation Controllerを選択。
Prototype Cells
Table View cell の identifierをCellに変更
TableView
新しくファイルを作りクラスはUITableViewを選択
Custom ClassでClassで先ほど作ったファイルのクラス名を選択
ソースコード
RefreshViewController.h
#import <UIKit/UIKit.h>

@interface RefreshViewController : UITableViewController{
    NSArray* StringArray;
}

@end
RefreshViewController.m
#import "RefreshViewController.h"

@interface RefreshViewController ()

@end

@implementation RefreshViewController

- (id)initWithStyle:(UITableViewStyle)style
{
    self = [super initWithStyle:style];
    if (self) {
        // Custom initialization
    }
    return self;
}

- (void)viewDidLoad
{
    [super viewDidLoad];

    StringArray = [[NSArray alloc] initWithObjects:@"東京",@"大阪", nil];
    [self.refreshControl addTarget:self action:@selector(updateRecords) forControlEvents:UIControlEventValueChanged];
}

- (void)didReceiveMemoryWarning
{
    [super didReceiveMemoryWarning];
}

- (NSInteger)numberOfSectionsInTableView:(UITableView *)tableView
{
    return 1;
}

- (NSInteger)tableView:(UITableView *)tableView numberOfRowsInSection:(NSInteger)section
{
    return StringArray.count;
}

- (UITableViewCell *)tableView:(UITableView *)tableView cellForRowAtIndexPath:(NSIndexPath *)indexPath
{
    static NSString *CellIdentifier = @"Cell";
    UITableViewCell *cell = [tableView dequeueReusableCellWithIdentifier:CellIdentifier forIndexPath:indexPath];

   if (!cell) {
       cell = [[UITableViewCell alloc] initWithStyle:UITableViewCellStyleSubtitle reuseIdentifier:CellIdentifier];
   }
    cell.textLabel.text = [StringArray objectAtIndex:indexPath.row];
    return cell;
}

-(void)updateRecords{
    StringArray = [[NSArray alloc] initWithObjects:@"関東",@"関西", nil];
    [self.tableView reloadData];
    [self.refreshControl endRefreshing];
}

@end
解説
RefreshController.h
NSArrayを宣言しているだけです
RefreshController.m
ViewDidLoad
StringArrayはテーブルの要素を入れているのみです。
refreshcontrolの部分が新しいですね。
refreshcontrolで、イベントを動作をリンクさせています。
今回のメンバ関数の内容を動作として記載すると、
UIControlEventValueChangedは値が変化したときなので、refreshControlの値が変更されたときにupdateRecordsを呼び出す
ような動作を行っていると思います。厳密には違いそうですが、、、。
イベントコントロールについてはこちらに記載されていました。
http://iphone-tora.sakura.ne.jp/uicontrol.html
numberOfSectionsInTableView,numberOfRowsINSection,cellForRowAtIndexPath
相変わらずの処理ですね。セルに内容を入れてテーブルを作っています。
updateRecords
self.tableView reloadData = 新しくテーブルを作っているだけです。
self.refreshControl endRefreshing =ここで更新作業は終わりですよ。(くるくるもここで終了)
動作
こんな表示から

くるくるまわって

できあがり、文字変わりましたよね!

iPhone CustomCellを作る。
皆さんこんばんわ
お元気ですか。私はC++のMakefileや便利ツールを聞いて色々と死にそうです。
ファイルの分割方法がよくわかりません。
これはいつか実験して学習するとしましょう。
さて、今回はCutomCellです。表の中をLabel2つにしたい!とか画像入れたい!とかそんなニーズにお答えするセルを作るのがこれです。
まぁセルの中にも色々突っ込んで修正したいわけです。自由がいいんです自由が
さぁいくぞ
プロジェクトの生成、Storyboardの編集
プロジェクト名:CustomCellTest
などなど
とりあえず、画面はこんな感じになります。
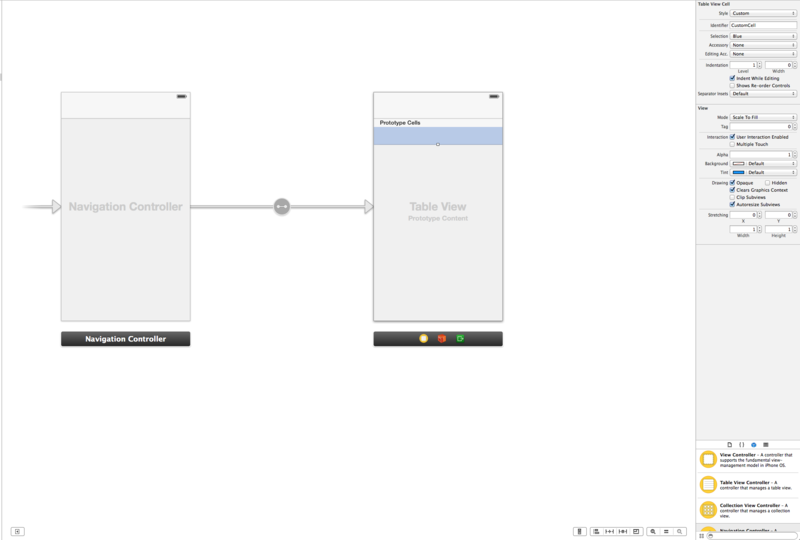
その上で、ラベルを追加します。
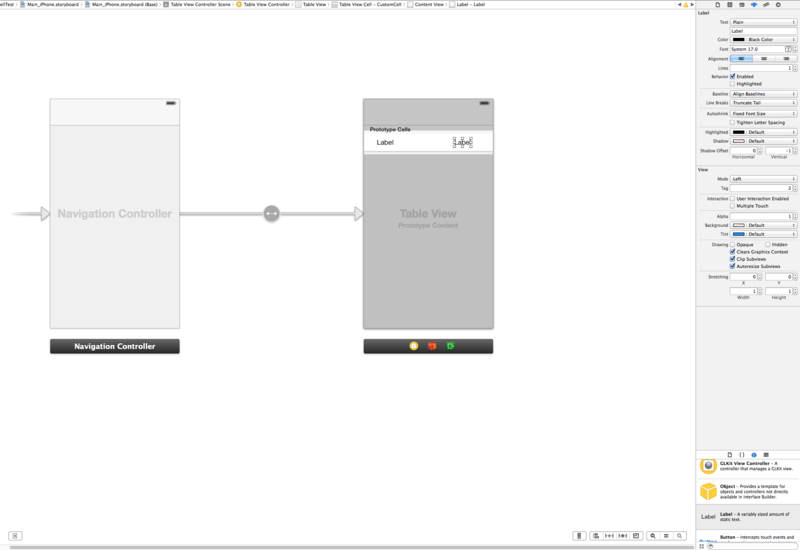
Viewのタグをそれぞれ1,2と設定します。
ソースコード周り
ファイルを生成します。ObjectiveC-classで大丈夫です。
CustomCell を UITableViewCell
TableView を UITableViewController
として生成してください。
PrototypeCellsのClassにCustomCellをC登録する。
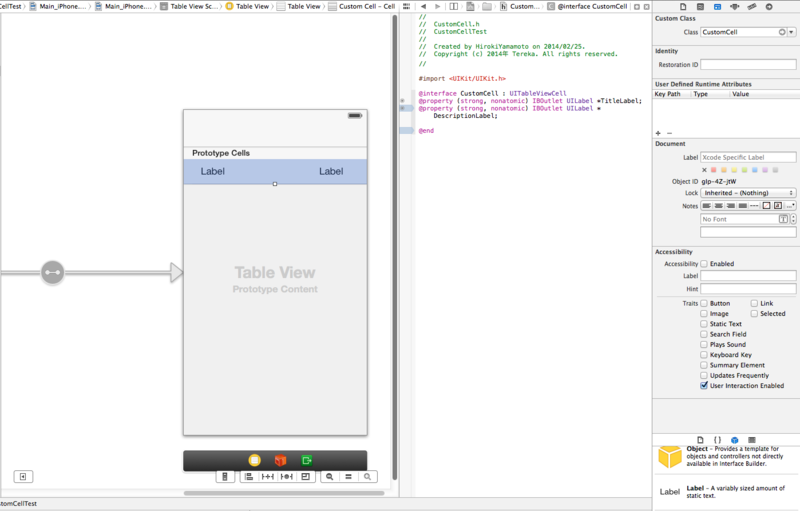
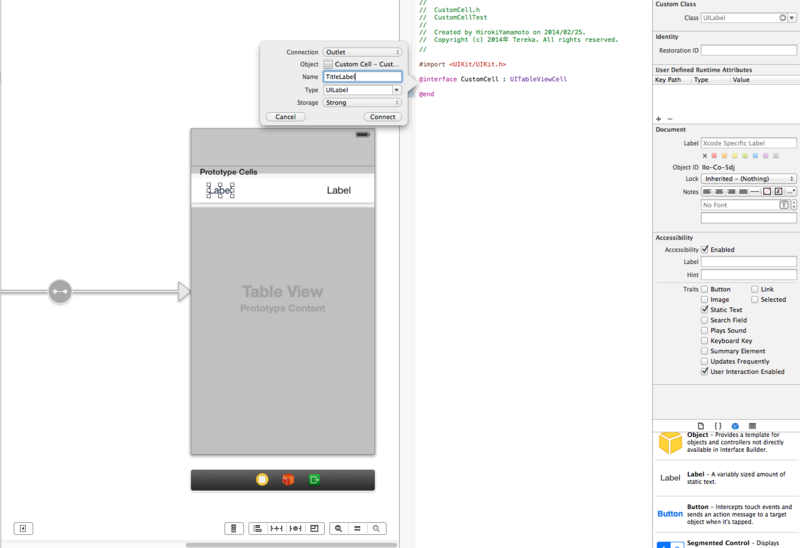
CustomCellにLabelなどを定義する。
定義の仕方はCustomCell.hへLabelなどをcontrolで引っ張って繋ぐ。
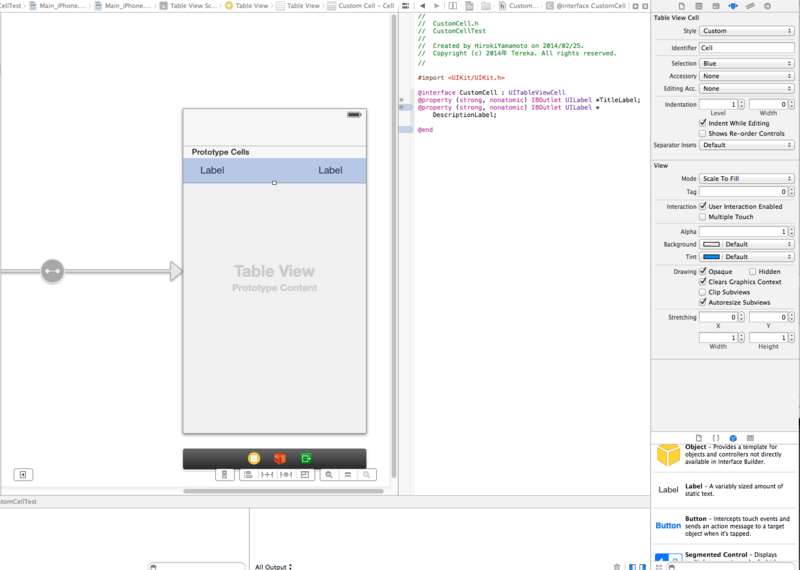
最後にidentifierをCellとして登録
ソースコード
CustomCell.h
#import <UIKit/UIKit.h>

@interface CustomCell : UITableViewCell
@property (strong, nonatomic) IBOutlet UILabel *TitleLabel;
@property (strong, nonatomic) IBOutlet UILabel *DescriptionLabel;

@end
Labelなどを紐で繋ぐだけ。
CustomCell.m
こちらは何も弄っていません。最初に生成された通りです。
#import "CustomCell.h"

@implementation CustomCell

- (id)initWithStyle:(UITableViewCellStyle)style reuseIdentifier:(NSString *)reuseIdentifier
{
    self = [super initWithStyle:style reuseIdentifier:reuseIdentifier];
    if (self) {
        // Initialization code
    }
    return self;
}

- (void)setSelected:(BOOL)selected animated:(BOOL)animated
{
    [super setSelected:selected animated:animated];

    // Configure the view for the selected state
}

@end
TableView.h
#import <UIKit/UIKit.h>
#import "CustomCell.h"

@interface TableView : UITableViewController{
    NSArray *TableArray;
    NSArray *DescriptionArray;
}
@property (strong, nonatomic) IBOutlet UITableView *myTableView;
テーブルに入れる内容をインスタンス変数として定義する。
TableView.m
#import "TableView.h"
#import "CustomCell.h"

@interface TableView ()

@end

@implementation TableView

- (id)initWithStyle:(UITableViewStyle)style
{
    self = [super initWithStyle:style];
    if (self) {
        // Custom initialization
    }
    return self;
}

- (void)viewDidLoad
{
    [super viewDidLoad];
     TableArray = [[NSArray alloc] initWithObjects:@"YAS",@"AS",@"Nis", nil];
     DescriptionArray = [[NSArray alloc] initWithObjects:@"ssS",@"AsS",@"Nis", nil];

    // Uncomment the following line to preserve selection between presentations.
    // self.clearsSelectionOnViewWillAppear = NO;

    // Uncomment the following line to display an Edit button in the navigation bar for this view controller.
    // self.navigationItem.rightBarButtonItem = self.editButtonItem;
}

- (void)didReceiveMemoryWarning
{
    [super didReceiveMemoryWarning];
    // Dispose of any resources that can be recreated.
}

#pragma mark - Table view data source

- (NSInteger)numberOfSectionsInTableView:(UITableView *)tableView
{
    // Return the number of sections.
    return 1;
}

- (NSInteger)tableView:(UITableView *)tableView numberOfRowsInSection:(NSInteger)section
{
    // Return the number of rows in the section.
    return TableArray.count;
}

- (UITableViewCell *)tableView:(UITableView *)tableView cellForRowAtIndexPath:(NSIndexPath *)indexPath
{
    static NSString *CellIdentifier = @"Cell";
    CustomCell *cell = [tableView dequeueReusableCellWithIdentifier:CellIdentifier forIndexPath:indexPath];

    if(!cell){
        cell = [[CustomCell alloc] initWithStyle:UITableViewCellStyleDefault reuseIdentifier:CellIdentifier];
    }
    cell.TitleLabel.text = [TableArray objectAtIndex:indexPath.row];
    cell.DescriptionLabel.text = [DescriptionArray objectAtIndex:indexPath.row];
    // Configure the cell...

    return cell;
}
ViewDidLoad
変数の内容を定義するのみ
numberOfSectionsInTableView
1でおkです。
numberOfRowsInSection
表の長さ
cellForRowAtIndexPath
表の列を確保し、cellの中身があれば、再利用する。
そして、NSArrayで定義した内容をLabelに入れる。
ただ、それだけです。
iPhone Application Twitterクライアントを作ろう
皆さんこんにちわ。
お元気ですか。私は眠いです。
今日はiPhone ApplicationでTwitterクライアントを作ってみようと思います。
Xcodeのインストールは割愛します。
プロジェクトの作成
まずは、新しいプロジェクトを生成します。今回はSingleViewApplicationを選択
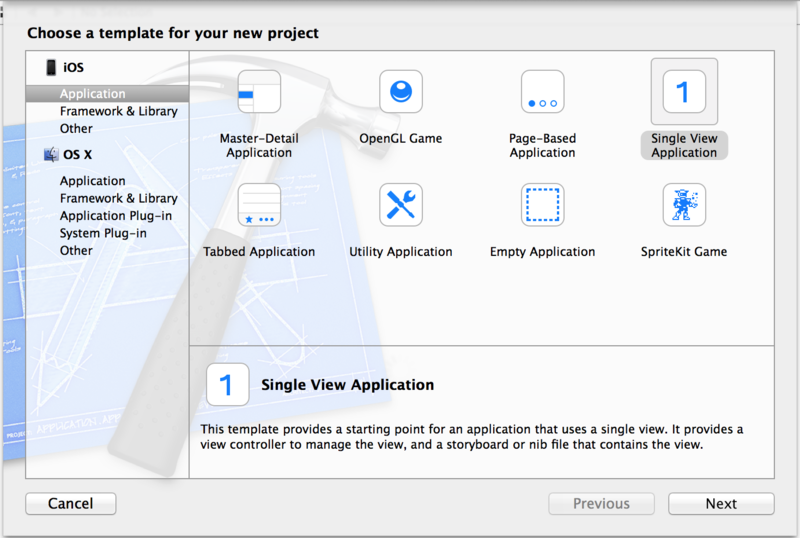
ProjectNameに適当な内容を追加、今回はTwitterApplicationとしました。
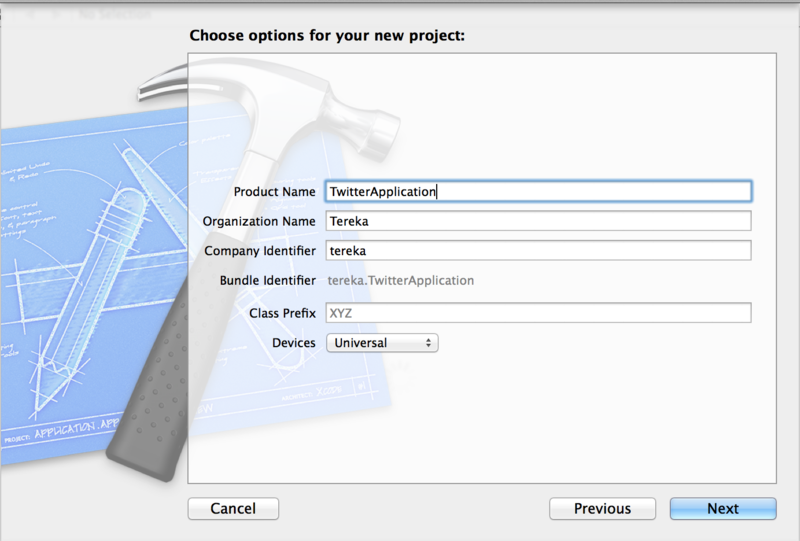
適当なフォルダでCreateを実行
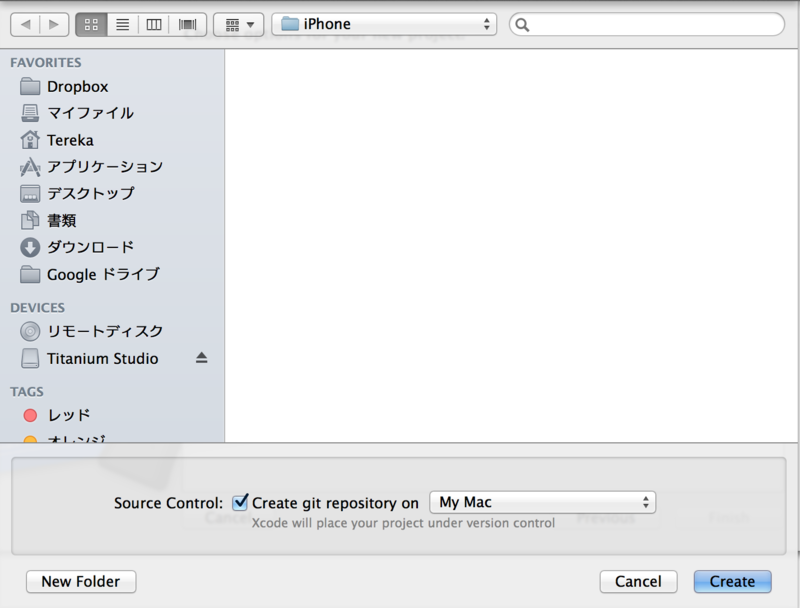
StoryBoard
画面を作成
次にstoryboardで画面を構築します。Main_iPhone.storyboardを選択。
最初は以下のようになっていると思います。
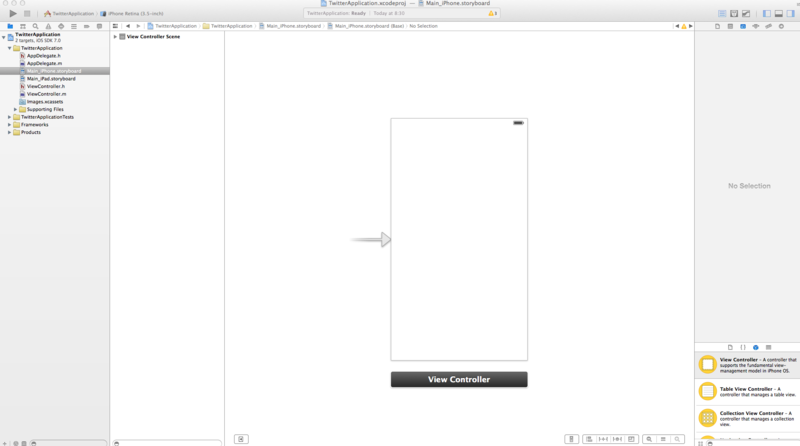
早速ViewControllerを削除し、TableViewを追加
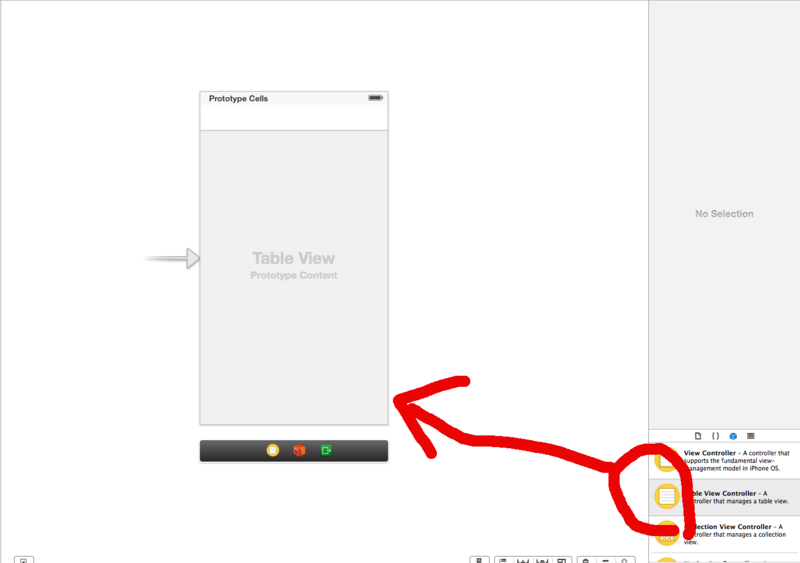
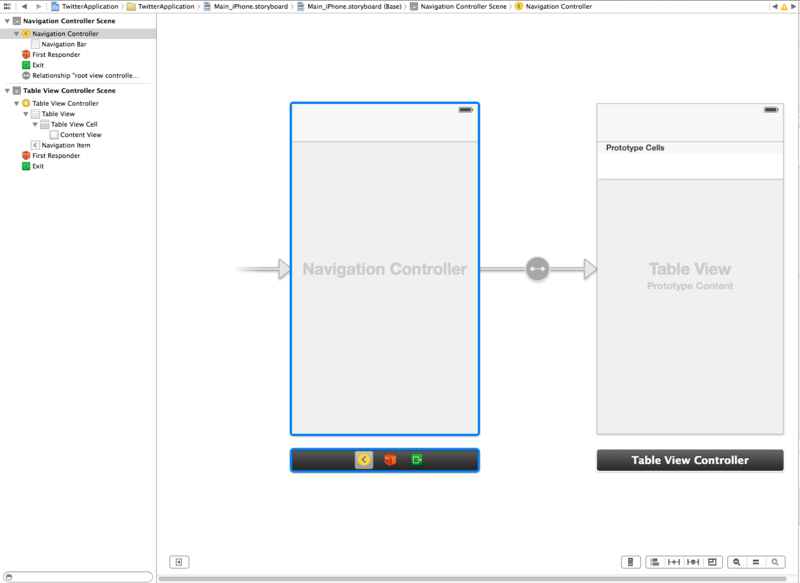
Table View Controllerを選択して、タブからEditor→Embed in →Navigation Controllerを選択
投稿ボタンを追加
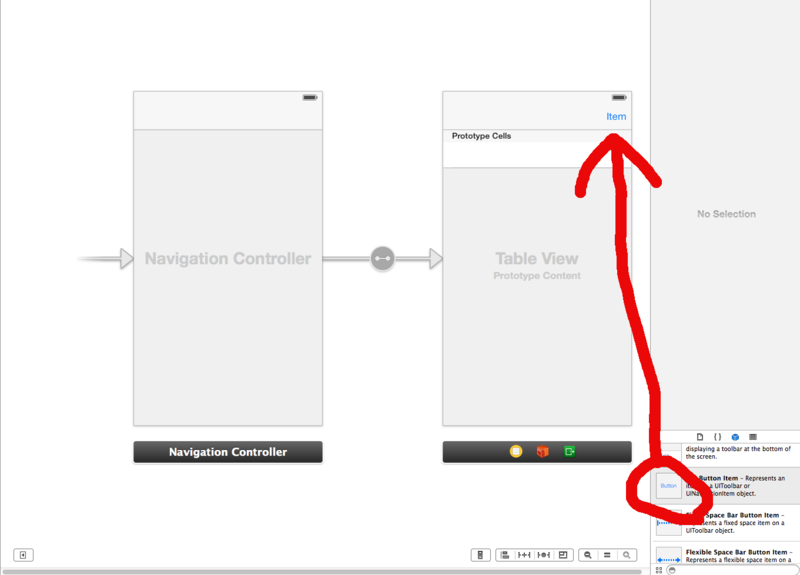
次に投稿ボタンを作ってみましょう。まずは、ボタンを置く。
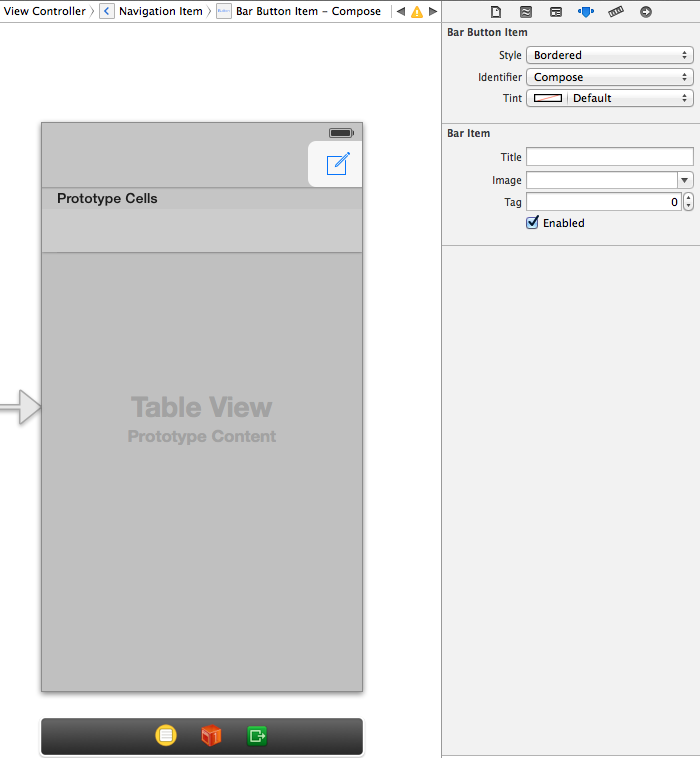
そしてプロパティにて変更する。identifierをComposeに
ファイルとViewの紐付け
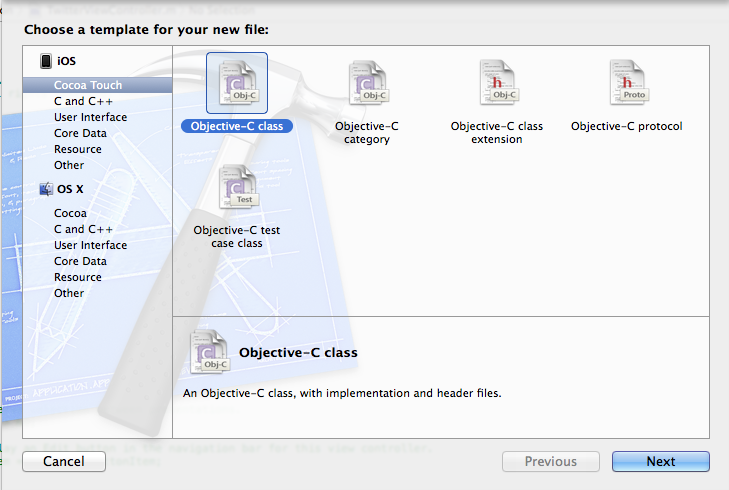
新しくファイルを作ります。このファイルに先ほど生成したTable Viewの実装を記入します。
Objective-C classを選択し、名前は適当に作ります。今回はTwitterViewControllerとしました。
しかし、現在、TableViewとこのTwitterViewControllerが紐づいていません。
紐づけましょう。Main_iPhone.storyboardを開き、TableViewをクリック
Custom Classのタブを選択し、TwitterViewControllerを選択
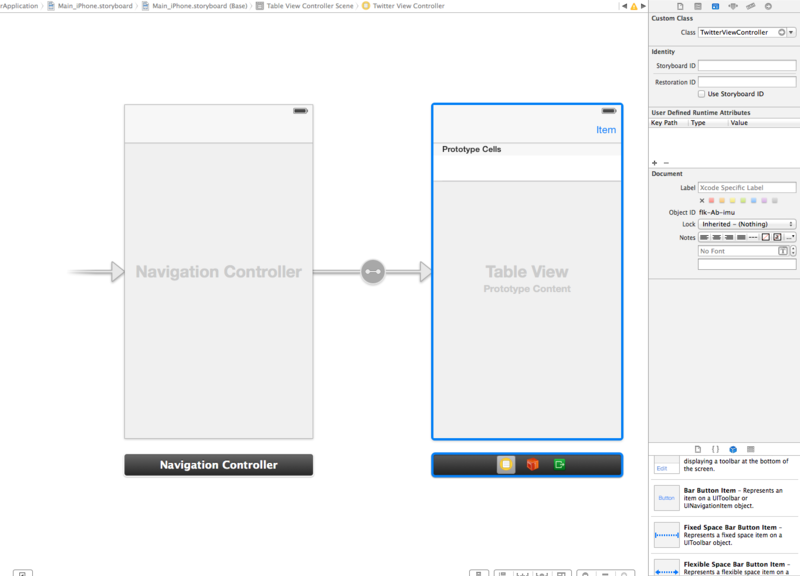
これで紐付けができました。
投稿ボタン実装編
ボタンはまだ紐づいていません。まずは、ボタンを押した時に実行するメソッドを登録しましょう。
TwitterViewController.hを開きましょう。
その上で、ボタンをクリックし、コントロールを押しながらファイルに線をのばすと画面が表れます。
ConnectionはActionを選択し、名前をTwitterButtonとしました。
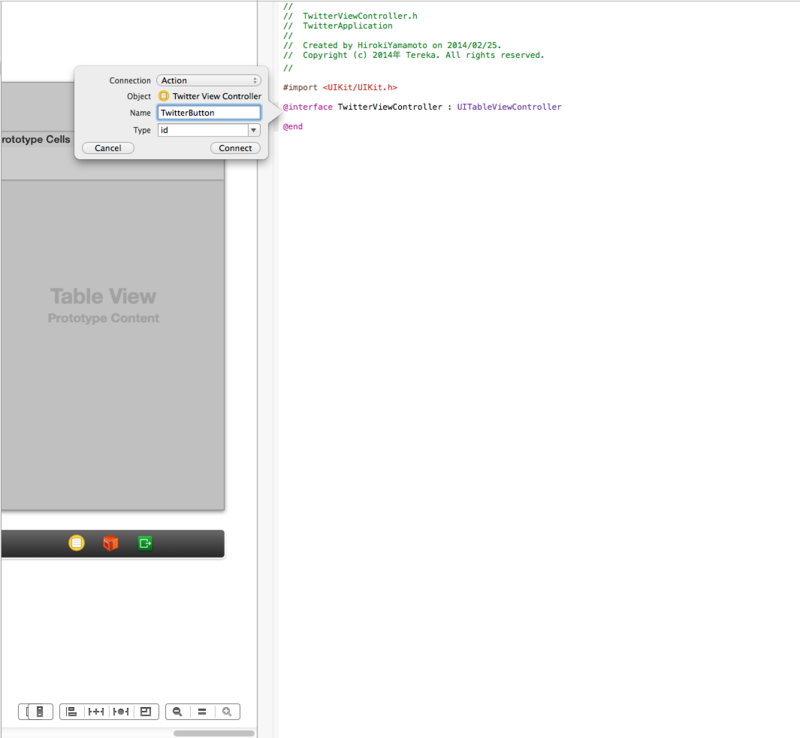
するとコードも変化し、以下のようになっていると思います。
#import <UIKit/UIKit.h>

@interface TwitterViewController : UITableViewController
- (IBAction)TwitterButton:(id)sender;

@end
これでメソッドを登録することができました。
さて、ボタンのメソッドの本体を書きましょう。
今度はTwitterViewController.mを開きます。
最後の方に
- (IBAction)TwitterButton:(id)sender {
}
が追加されているので、この中に書きます。
ヘッダーに
以下のように変更してください。
#import <Social/Social.h>

(略)

- (IBAction)TwitterButton:(id)sender {
    SLComposeViewController *twitterPostVC = [SLComposeViewController composeViewControllerForServiceType:SLServiceTypeTwitter];
    [twitterPostVC setInitialText:@"てすと"];
    [self presentViewController:twitterPostVC animated:YES completion:nil];
}
1行目でTwitterの画面を生成し、2行目でテキストを突っ込み、3行目で呼び出しているだけです。
まぁSocialのメソッドなりクラスが勝手に画面を作ってくれます。便利です。
Runしてボタンをクリックして以下のような画面が出れば成功です。
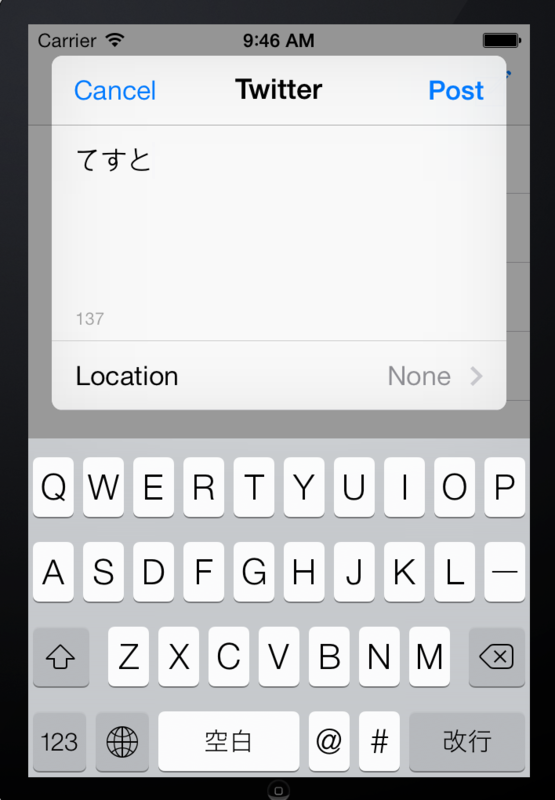
タイムラインの表示
さて、後はコードを書くだけです。
viewDidLoad
- (void)viewDidLoad
{
    [super viewDidLoad];
    //最近、APIが変更になったのでurlは気をつけましょう。
    NSString *apiURL = @"https://api.twitter.com/1.1/statuses/home_timeline.json";

    ACAccountStore *store = [[ACAccountStore alloc] init];
    ACAccountType *twitterAccountType =
    [store accountTypeWithAccountTypeIdentifier:ACAccountTypeIdentifierTwitter];

    [store requestAccessToAccountsWithType:twitterAccountType options:nil completion:^(BOOL granted,NSError *error){
        if(!granted){
            NSLog(@"Twitterの認証を拒否");
        }else{
            NSArray *twitterAccounts = [store accountsWithAccountType:twitterAccountType];
            if ([twitterAccounts count] > 0) {
                ACAccount *account = [twitterAccounts objectAtIndex:0];
                NSMutableDictionary *params = [[NSMutableDictionary alloc] init];
                [params setObject:@"1" forKey:@"include_entities"];

                NSURL *url = [NSURL URLWithString:apiURL];
                SLRequest *request = [SLRequest requestForServiceType:SLServiceTypeTwitter
                                                        requestMethod:SLRequestMethodGET
                                                                  URL:url parameters:params];
                [request setAccount:account];
                [UIApplication sharedApplication].networkActivityIndicatorVisible = YES;
                [request performRequestWithHandler:^(NSData *responseData,NSHTTPURLResponse *urlResponse,NSError *error) {
                    if(!responseData){
                        NSLog(@"response error: %@", error);
                    }else{
                        NSError *jsonError;
                        tweets = [NSJSONSerialization JSONObjectWithData:responseData
                                                                 options: NSJSONReadingMutableLeaves error:&jsonError];
                        if(tweets){
                            dispatch_async(dispatch_get_main_queue(), ^{ // 追加
                                [self.tableView reloadData]; // 追加
                            });
                        }else{
                            NSLog(@"%@", error);
                        }
                    }
                }];
            }
        }
    }];
viewDidLoadメソッドはページ実行時に実行されるメソッドです。
ポイントをいくつかご紹介します。
apiURL
apiURL 今年にTwitterのプロトコルが変更され、httpからhttpsに変更されました。その都合でいくつかのブログのurlでapi動作しないことがあります、気をつけましょう。
requestAccessToAccountsWithType
認証を要求する箇所。
grantedの中にTrue or Falseが入っている。
SLRequest
APIをたたくクラス、Oathなどをスルーしてくれるそうです。
NSJSONSerialization
返ってきたデータを変換する。
dispatch_async
同期的に実行する為のメソッド
self.tableView reloadData
データをリロードする。テーブルを再描写
numberOfSectionsInTableView
繰り返しのセルの数
- (NSInteger)numberOfSectionsInTableView:(UITableView *)tableView
{
    // Return the number of sections.
    return 1;
}
numberOfRowsInSection
行数を突っ込めば大丈夫です。
- (NSInteger)tableView:(UITableView *)tableView numberOfRowsInSection:(NSInteger)section
{
    // Return the number of rows in the section.
    return [tweets count];
}
cellForRowAtIndexPath
セルの内容を決めるメソッドです。
- (UITableViewCell *)tableView:(UITableView *)tableView cellForRowAtIndexPath:(NSIndexPath *)indexPath
{
    static NSString *CellIdentifier = @"Cell";
    UITableViewCell *cell = [tableView dequeueReusableCellWithIdentifier:CellIdentifier];

    // Configure the cell...
    if(cell == nil){
         cell = [[UITableViewCell alloc] initWithStyle:UITableViewCellStyleDefault reuseIdentifier:CellIdentifier];
    }

    NSDictionary *status = [tweets objectAtIndex:indexPath.row];
    NSString *text = [status objectForKey:@"text"];

    cell.textLabel.text = text;

    return cell;
}
描写するセルなどを指定しています。
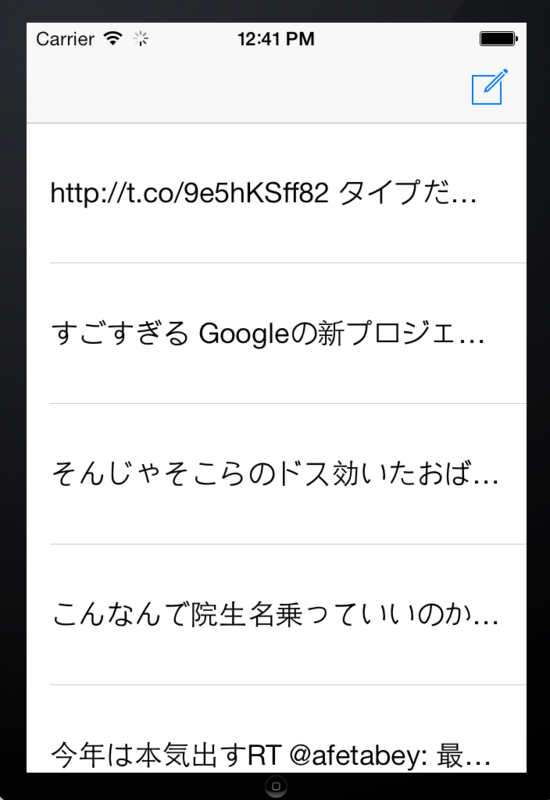
参考文献
http://qiita.com/paming/items/9a6b51fa56915d1f1d64
http://www.appbank.net/2012/06/30/iphone-news/434166.php
http://ios.rainbowapps.jp/text_dev/10
次回はさすがにユーザー名を表示をしたいのでカスタムセル周りを対策したいと思います。
TwitterViewController
TwitterViewController.h
#import <UIKit/UIKit.h>

@interface TwitterViewController : UITableViewController{
    NSArray *tweets;
}
- (IBAction)TwitterButton:(id)sender;

@end
TwitterViewController.m
#import "TwitterViewController.h"
#import <Social/Social.h>
#import <Accounts/Accounts.h>

@interface TwitterViewController ()

@end

@implementation TwitterViewController

- (id)initWithStyle:(UITableViewStyle)style
{
    self = [super initWithStyle:style];
    if (self) {
        // Custom initialization
    }
    return self;
}

- (void)viewDidLoad
{
    [super viewDidLoad];
    [self.tableView registerClass:[UITableViewCell class] forCellReuseIdentifier:@"TweetCell"];
    //最近、APIが変更になったのでurlは気をつけましょう。
    NSString *apiURL = @"https://api.twitter.com/1.1/statuses/home_timeline.json";

    ACAccountStore *store = [[ACAccountStore alloc] init];
    ACAccountType *twitterAccountType =
    [store accountTypeWithAccountTypeIdentifier:ACAccountTypeIdentifierTwitter];

    [store requestAccessToAccountsWithType:twitterAccountType options:nil completion:^(BOOL granted,NSError *error){
        //Twitterの認証の拒否or認証
        if(!granted){
            NSLog(@"Twitterの認証を拒否");
        }else{
            NSArray *twitterAccounts = [store accountsWithAccountType:twitterAccountType];
            if ([twitterAccounts count] > 0) {
                ACAccount *account = [twitterAccounts objectAtIndex:0];
                NSMutableDictionary *params = [[NSMutableDictionary alloc] init];
                [params setObject:@"1" forKey:@"include_entities"];

                NSURL *url = [NSURL URLWithString:apiURL];
                SLRequest *request = [SLRequest requestForServiceType:SLServiceTypeTwitter
                                                        requestMethod:SLRequestMethodGET
                                                                  URL:url parameters:params];
                [request setAccount:account];
                [UIApplication sharedApplication].networkActivityIndicatorVisible = YES;
                [request performRequestWithHandler:^(NSData *responseData,NSHTTPURLResponse *urlResponse,NSError *error) {
                    if(!responseData){
                        NSLog(@"response error: %@", error);
                    }else{
                        NSError *jsonError;
                        tweets = [NSJSONSerialization JSONObjectWithData:responseData
                                                                 options: NSJSONReadingMutableLeaves error:&jsonError];
                        if(tweets){
                            dispatch_async(dispatch_get_main_queue(), ^{ // 追加
                                [self.tableView reloadData]; // 追加
                            });
                        }else{
                            NSLog(@"%@", error);
                        }
                        //Tweet取得完了に伴い、Table Viewを更新
                    }
                }];
            }
        }
    }];
}

- (void)didReceiveMemoryWarning
{
    [super didReceiveMemoryWarning];
    // Dispose of any resources that can be recreated.
}

#pragma mark - Table view data source

- (NSInteger)numberOfSectionsInTableView:(UITableView *)tableView
{
    // Return the number of sections.
    return 1;
}

- (NSInteger)tableView:(UITableView *)tableView numberOfRowsInSection:(NSInteger)section
{
    // Return the number of rows in the section.
    return [tweets count];
}

- (UITableViewCell *)tableView:(UITableView *)tableView cellForRowAtIndexPath:(NSIndexPath *)indexPath
{
    static NSString *CellIdentifier = @"Cell";
    UITableViewCell *cell = [tableView dequeueReusableCellWithIdentifier:CellIdentifier];

    if(cell == nil){
         cell = [[UITableViewCell alloc] initWithStyle:UITableViewCellStyleDefault reuseIdentifier:CellIdentifier];
    }

    NSDictionary *status = [tweets objectAtIndex:indexPath.row];
    NSString *text = [status objectForKey:@"text"];

    cell.textLabel.text = text;

    return cell;
}


- (IBAction)TwitterButton:(id)sender {
    SLComposeViewController *twitterPostVC = [SLComposeViewController composeViewControllerForServiceType:SLServiceTypeTwitter];
    [twitterPostVC setInitialText:@"てすと"];
    [self presentViewController:twitterPostVC animated:YES completion:nil];
}
@end
