Go言語を触ったことのない人間がSensorBeeを使ってみた Part2
皆さんこんにちは
お元気ですか。
前回からあいてしまいましたが、引き続き
SensorBeeのturtorialをやってみます。
こちらは準備段階に2段階あり、elasticsearch,kibanaのインストールとtutrialの実施です。
準備
Elastisearch並びにkibanaのインストール
elasticsearch、kibanaは公式から取得するのが良いと思います。
公式ではversion2.2.0ですが、今回は最新の安定版2.3.2で実行してみます。
$ ./bin/elasticsearch
[2016-05-04 23:13:01,634][INFO ][node                     ] [Impulse] version[2.3.2], pid[41126], build[b9e4a6a/2016-04-21T16:03:47Z]
[2016-05-04 23:13:01,635][INFO ][node                     ] [Impulse] initializing ...
起動確認は以下のcurlコマンドで実施できます。
curlコマンドのレスポンスがかえって来れば問題ありません。nameなどは立ち上げるたびに変わるので・・
$ curl http://localhost:9200/
{
  "name" : "Aliyah Bishop",
  "cluster_name" : "elasticsearch",
  "version" : {
    "number" : "2.3.2",
    "build_hash" : "b9e4a6acad4008027e4038f6abed7f7dba346f94",
    "build_timestamp" : "2016-04-21T16:03:47Z",
    "build_snapshot" : false,
    "lucene_version" : "5.5.0"
  },
  "tagline" : "You Know, for Search"
}
kibanaの起動確認は以下の通り、こちらも公式サイトから取得しましょう。
$ ./bin/kibana
  log   [23:43:01.165] [info][status][plugin:sense] Status changed from uninitialized to green - Ready
  log   [23:43:01.171] [info][status][plugin:kibana] Status changed from uninitialized to green - Ready
  log   [23:43:01.193] [info][status][plugin:elasticsearch] Status changed from uninitialized to yellow - Waiting for Elasticsearch
  log   [23:43:01.207] [info][status][plugin:kbn_vislib_vis_types] Status changed from uninitialized to green - Ready
  log   [23:43:01.213] [info][status][plugin:markdown_vis] Status changed from uninitialized to green - Ready
  log   [23:43:01.224] [info][status][plugin:metric_vis] Status changed from uninitialized to green - Ready
tutorialの設定
$ go get github.com/sensorbee/tutorial/ml
$ cp -r $GOPATH/src/github.com/sensorbee/tutorial/ml/config/* /path/to/sbml/
$ cp -r $GOPATH/src/github.com/sensorbee/tutorial/ml/config/* ./sbml/
$ cd sbml/
fluentd
最後にfluentdです。(ここはLogstashではないのか・・・)
まず、初めにbundlerが入っていことを確認しましょう。versionがコンソールに表示されていなければ
$gem list | grep bundler
入っていなければ、以下のコマンドを実行しましょう。
$sudo gem install bundler
最後にbundle installを使って、fluentdを実行します。
$ bundle install --path vendor/bundle
$ bundle exec fluentd --version
fluentd 0.12.23
fluentdの起動確認をしましょう。以下のような表示がコンソールに出れば成功です。
$ bundle exec fluentd -c fluent.conf
2016-05-04 23:50:17 +0900 [info]: reading config file path="fluent.conf"
2016-05-04 23:50:17 +0900 [info]: starting fluentd-0.12.23
2016-05-04 23:50:17 +0900 [info]: gem 'fluentd' version '0.12.23'
2016-05-04 23:50:17 +0900 [info]: gem 'fluent-plugin-elasticsearch' version '1.4.0'
2016-05-04 23:50:17 +0900 [info]: adding match pattern="sensorbee.tweets" type="elasticsearch"
2016-05-04 23:50:17 +0900 [info]: adding source type="forward"
2016-05-04 23:50:17 +0900 [info]: using configuration file: <ROOT>
  <source>
    @type forward
    @id forward_input
  </source>
  <match sensorbee.tweets>
    @type elasticsearch
    host localhost
    port 9200
    include_tag_key true
    tag_key @log_name
    logstash_format true
    flush_interval 1s
  </match>
</ROOT>
2016-05-04 23:50:17 +0900 [info]: listening fluent socket on 0.0.0.0:24224
^C2016-05-04 23:50:34 +0900 [info]: shutting down fluentd
2016-05-04 23:50:34 +0900 [info]: shutting down input type="forward" plugin_id="forward_input"
2016-05-04 23:50:34 +0900 [info]: shutting down output type="elasticsearch" plugin_id="object:3fc04d87f990"
2016-05-04 23:50:34 +0900 [info]: process finished code=0
今回はtwitterを解析するので、api_keyの設定をします。
api_keyはtwitterの公式サイトより、取得することができます。
公式サイトに掲載されている以下の雛形にしたがって、api_key.yamlを作成しましょう。
$ go get gopkg.in/sensorbee/sensorbee.v0/...
$ build_sensorbee
sensorbee_main.go
$ ./sensorbee run -c sensorbee.yaml
INFO[0000] Setting up the server context                 config={"logging":{"log_dropped_tuples":false,"min_log_level":"info","summarize_dropped_tuples":false,"target":"stderr"},"network":{"listen_on":":15601"},"storage":{"uds":{"params":{"dir":"uds"},"type":"fs"}},"topologies":{"twitter":{"bql_file":"twitter.bql"}}}
INFO[0000] Setting up the topology                       topology=twitter
INFO[0007] Starting the server on :15601
この時に立ち上がっていれば、kibana上で以下の画面を見ることができます。
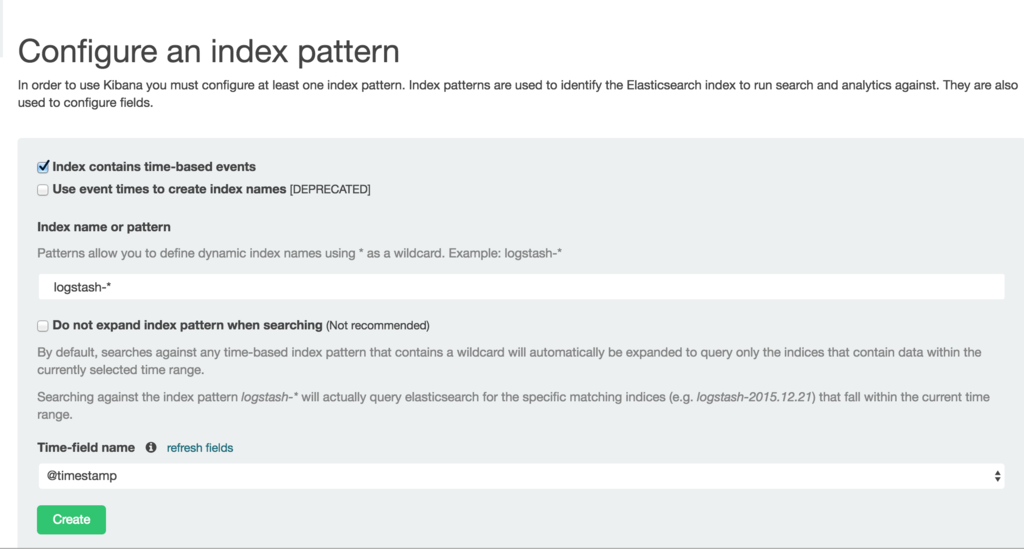
まずは、kibana上で可視化したいelasticsearchのindexを指定します。

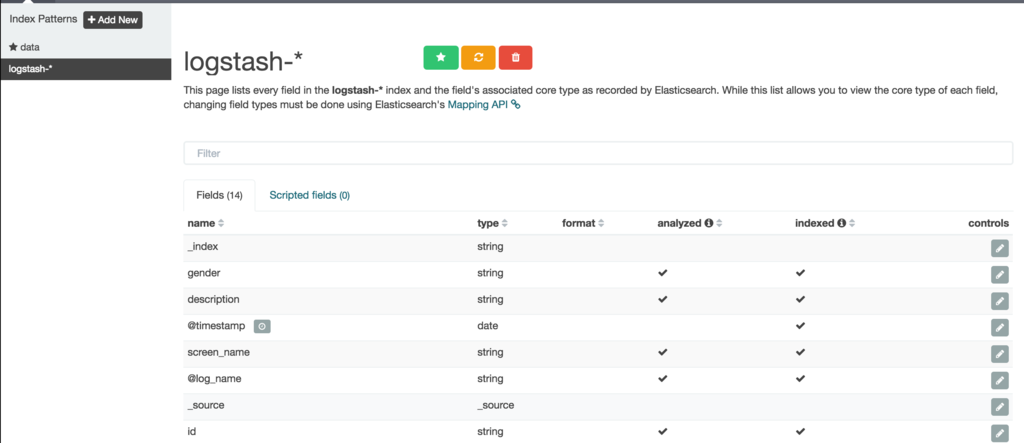
indexを指定すると以下の画面を見ることができます。

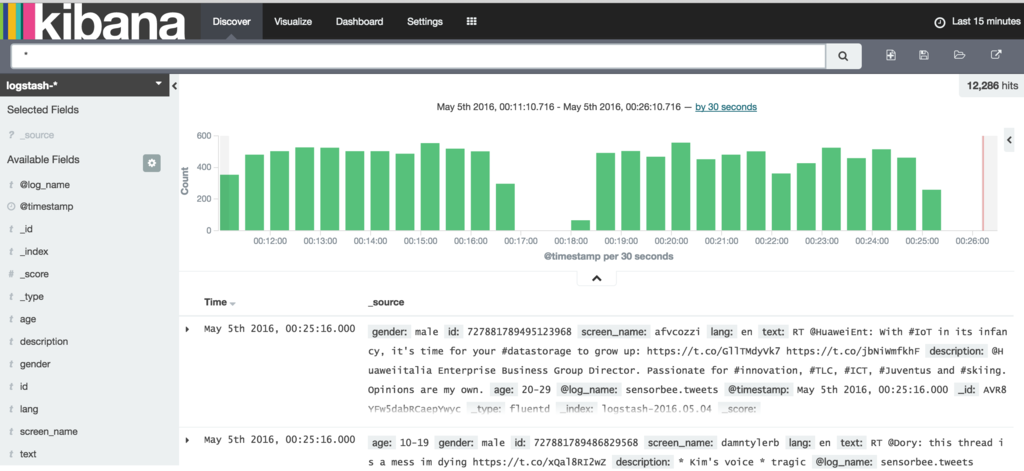
最後にDiscoveryをクリックするとデータが投入されている様子がわかります。

トラブルが発生している場合は・・・
sensorbee shell -t twitter
まずは、以下のコマンドを入力し、データが取得できているかを確認します。
twitter > SELECT RSTREAM * FROM public_tweets [RANGE 1 TUPLES];
twitter > SELECT RSTREAM * FROM labeled_tweets [RANGE 1 TUPLES];
データが取得できている場合は更に以下のコマンドを実行し、ストリーム生成処理が成功しているかを確認します。
CREATE SOURCE public_tweets TYPE twitter_public_stream
    WITH key_file = "api_key.yaml";
以下、暫くはBQLの紹介なのでスキップし、機械学習部分に行きます。
機械学習
まずは、既存にある機械学習のモデルを読み込みます。
twitter> LOAD STATE age_model TYPE jubaclassifier_arow
    OR CREATE IF NOT SAVED
    WITH label_field = "age", regularization_weight = 0.001;
twitter> LOAD STATE gender_model TYPE jubaclassifier_arow
    OR CREATE IF NOT SAVED
    WITH label_field = "gender", regularization_weight = 0.001;
評価はEVAL Statementを使うことで実施可能です。
twitter> EVAL jubaclassify("gender_model", {
    "text": {"i": 1, "wanna": 1, "eat":1, "sushi":1},
    "description": {"i": 1, "need": 1, "sushi": 1}
});
maleかfemaleのどちらかであることを評価するためにはjuba_classified_labelを使用します。
twitter> EVAL juba_classified_label({
    "male":0.021088751032948494,"female":-0.020287269726395607});
機械学習のトレーニングに躓いているので、こちらは余裕があればやることにします。